
 US
US  Canada
 When Sound Devices released information on the CL-8, the most common question customers asked was “How?” “How does it add recording tracks?” “How do you route to the new auxes and where do they output?” Sadly, my answers were usually, “I’m not sure, but Sound Devices rarely disappoints.” Now that I’ve had a CL-8 to play with I can assure you they do not disappoint. Let me tell you how.
To start it is important to understand much of the CL-8’s functionality stems from the new software, Version 1.6. Even if you have loaded Version 1.6 on your 788T, it does not fully load until you connect a CL-8. Upon mating the two units together the 788T recognizes the CL-8 and prompts the user to complete the software update. The software update allows discreet recording of each input, as well as a left track, right track, aux 1 track, and aux 2 track, for a total of twelve. Once the update completes, our little adventure begins.
Take a look at this image.
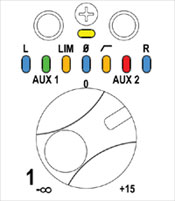
Starting on the top you’ll see two buttons (Sound Devices calls them A and B), the second row includes seven LEDs. Here are some quick shortcuts for using these controls. First there are three “layers” of controls in front of you. Within these controls you can: view input activity; route audio to left, right, aux 1, and aux 2; activate the limiter; switch polarity; view high-pass status; solo an input (pre-fader); or mute an input. Remember each fader section deals with the input side of the recorder. The left side of the unit has a button marked ALT. This is your layer cycle button. Upon every start-up you begin in the Main View layer.
Controls in the Main View:
1. Press the left (A) button to route the input to the left recording track.
2. Press the right (B) button to route the input to the right recording track.
3. Press both A and B to solo the input pre-fader.
Press the ALT button to move to the second layer, Aux Routing View.
- Press the A button to route the input to Aux 1 (marked in the recorder as Track X1).
- Press the B button to route the input to Aux 2 (marked in the recorder as Track X2).
- Holding either A or B buttons will toggle the input routing to Aux between pre and post-fader. Green LEDs indicate a pre-fade setting, red LEDs show post-fade.
Press the ALT button to move to the third layer, Input Settings View.
- Press the A button to enable/disable the input limiter.
- Press the B button to enable/disable the high-pass filter.
- Press both A and B to invert the input polarity.
With the addition of the auxiliary tracks you’ll probably want to route those tracks to a specific output. The 788T menu, with Version 1.6 firmware, now shows Track X1 and Track X2 as output source selections.
Finally, the CL-8 adds a slate microphone to the recorder. The Slate mic button is located under the ALT button on the left side of the unit. Simply press it and all tracks open. While pressing the slate button, the 788T selection knob becomes a gain control on the mic and the screen displays a microphone with dB reading. Gain is adjustable from -46 to +6 dB. The slate mic links the CL-8 and 788T to a common drawing board. The actual mic is on the 788T, while its function is only available with the addition of the CL-8. All part of the Sound Devices Master Plan I’d guess.
It may seem that these controls are very simple–because they are. But don’t underestimate the power this small add-on creates in your 788T recorder. Four additional tracks, slate mic, and most importantly full mixing capabilities. Complete with the CL-8, the 788T is not just a recorder anymore.

Leave a reply
You must be logged in to post a comment.